
You have built a website. The story of building your online presence and being visible is not over yet. It is still a long way to go on the journey to searchability!
Here we are, to be a guiding light for you! And today, we have cherry-picked “how to use Google Search Console” for the discussion, and it’s just the beginning!
What do you mean by Google Search Console?
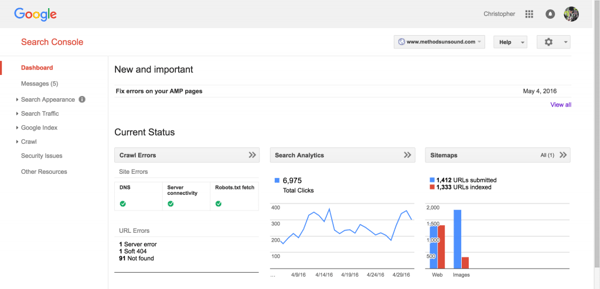
Previously well known as Google Webmaster Tools, Google Search Console is a tool, available free of cost, with which you can monitor the performance of individual attributes of your website. This includes pages and queries getting the highest amount of traffic, search results, performance of the mobile site, and referring domains.
Source: Search Engine Watch
Now the question arises, how to use Google Search Console?
Setting up Google Search Console can be quite overwhelming. The reason being, availability of a lot of graphs, labels, and filters on the dashboard.
Solution? A quick and easy-to-digest introductory guide on how to set up Google Search Console!
Setting up Google Search Console for your website
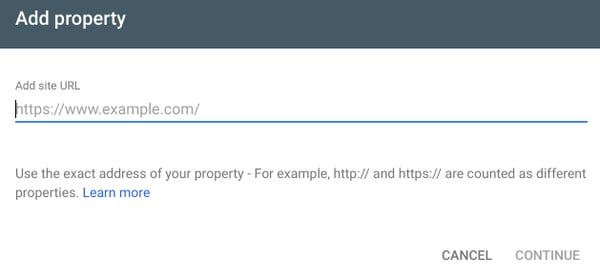
Begin with adding your website on Google Search Console
Start by being crystal clear about your website, whether it is a personal website or a business website. If it’s a business website, make sure you sign in to your google business account, go to google search console home, and then add your website to the console by going to the Google Webmaster Tools option. Moving on to clicking the option “Add a property” and then enter the URL of your website.
Source: Yoast
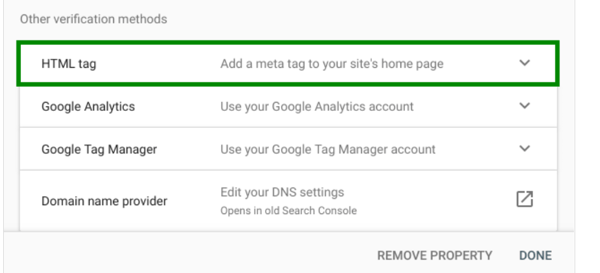
An important step to perform here is to verify that you are the owner of this website. For doing that, you need to choose the method of verifying your website. The methods include GTM Container snippet, HTML file upload, HTML tag, GA tracking code, and domain name provider.
You must be wondering, why verify the website? Why this hassle? A simple and straightforward answer to this is that by verifying, you let Google give the user control over a specific property.
Also, since Google Search Console gives out confidential information regarding the app or the website’s performance, and its crawling-related information, it needs to ensure proper verification that you are the actual owner of that property.
Simply verifying your website won’t ensure that you get a higher ranking in Google search results, but of course, it is easier to rank higher with more information that you put in there.
Source: Yoast SEO
Do not forget to add all the domains that you own, along with both http:// and https:// as a separate site, if your website supports each one of them.
Mind it, it is still not a complete answer to “how to use google search console”. We have more to do.
Now, diving straight into the verification methods that we spoke about. What are they actually? That’s what we are going to cover in the below section. Hop on!
Methods of verifying your website
Every webpage has an HTML code on which it is built. You can verify your website by entering the <meta> tag to the HTML code of a particular page. Ensure that this tag goes in the <head> section and not the <body> section. After this, Google verifies that the <meta> tag is added to the right place, and if it cannot find the tag, certain errors would be triggered with the details.
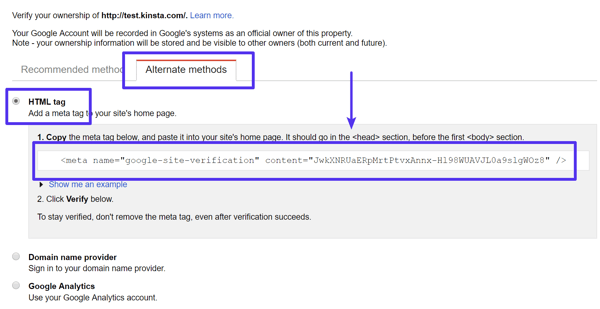
Source: Kinsta
Now, talking about the certain types of errors encountered. One is, if the meta tag is nowhere to be found, or found at the wrong location, then you need to re-check if the meta tag is on the correct page, and on the correct location on the page. Another error could be an incorrect meta tag. In this case, consider re-checking the meta tag’s contents.
- Google Analytics Tracking Code
In case you make use of Google Analytics to track the site’s traffic, you can do the verification of your website using the Google Analytics tracking code connected to the site. For achieving this, you need to have “edit” permission for the property whose tracking code is going to be used by that webpage. Additionally, you need to ensure that the snippet used by the tracking code must be analytics.js or gtag.js type.
Now, we will discuss the steps to follow for verifying your website using Google Analytics Tracking Code. First of all, on the verification details page, select Google Analytics, and then enter the tracking code in the <head> section of the page. Any modifications in the code would lead to verification failure.
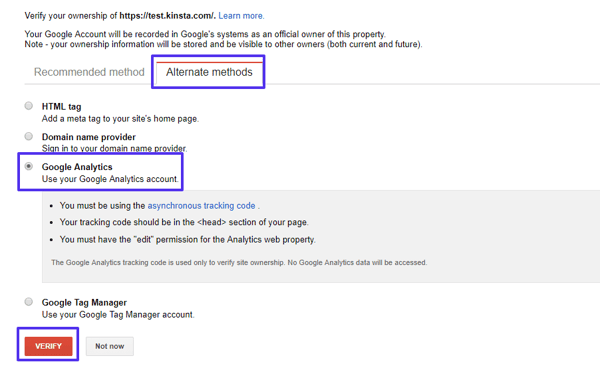
Source: Kinsta Site Verification Blog
- Google Tag Manager
Consider the situation where you have a Google Tag Manager account activated. In that case, you can verify your website by choosing Google Tag Manager on the verification details page. Then, take the <noscript> part of the tag manager code and place it after the initial <body> tag of the page. Ensure using the code as it is, with no modifications, to avoid verification failure. Also, without “publish” permission, you cannot access the tag manager code.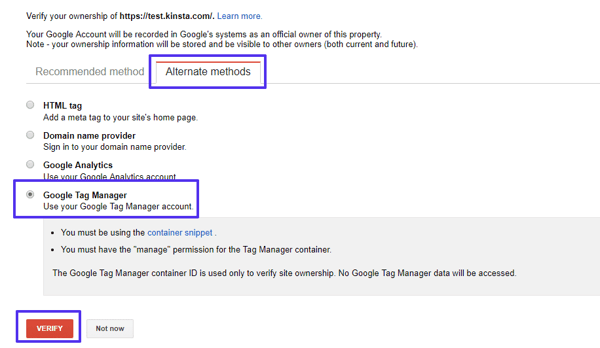
Source: Kinsta Google Site Verification
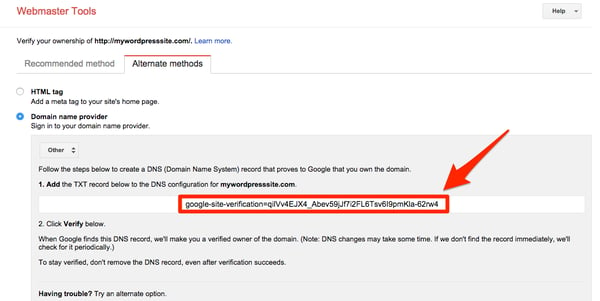
- Domain name provider
Putting a DNS record to your domain name provider can be another way of verifying your website property. CNAME format and the TXT DNS format are both equally supported by Google Search Console.
Begin by signing in to your domain name provider. You may use a CNAME record if verifying a website which is itself defined with a CNAME record. You may use a TXT DNS record for all the other instances.
To generate a DNS record, a) go to Webmaster Central, mention your bare property URL, and click Continue. b) Then, Alternate Methods> Domain name provider. c) Pick up your provider from the list there or Others. d) Click on Add a CNAME record, which would generate a CNAME record. 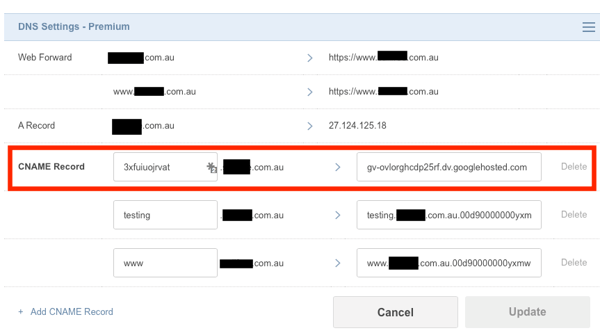
Source: Webmasters Stack exchange
Once you generate the DNS record, add it to your domain service provider. And then, verify.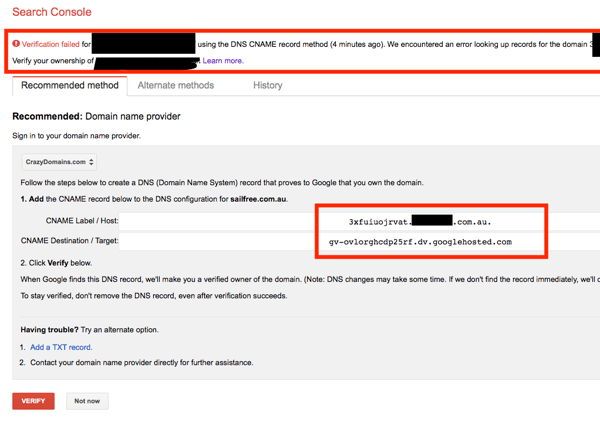
Source: Webmasters
To generate a TXT DNS record, after choosing the domain verification method option, you will be provided with a TXT record in the form of a string value. Post that, you need to add that record to your domain provider by: a) signing in to your domain host b) Adding the TXT DNS record to the provider’s DNS records c) clicking on verify.
Source: Howcanyousolve
Above are the different verification methods for your website. Make sure you follow all the steps in the sequence and use the codes in its original format to avoid going through the discomfort of verification failure and going through all the steps again. And get an answer to your question- “how to use Google search console”. If you follow all the above guidelines, you will find all the options available on the Google search console home, which is easy to use.
Read the second part on how to set up Google Search Console.